If your laptop has been running a bit hot lately, and you’ve been looking to increase its cooling fan speeds. Here’s a quick but detailed guide on how exactly to do that.
Whenever we tweak the fan speed of Laptop , fan sound becomes noisy and annoying. Here I'm giving you quick but detailed guide on how exactly we can do that.
There are multiple ways in which you can tweak the fan speed of your laptop, kindly scroll below for that.
Before We Begin
We should mention that changing your laptop fan speed could potentially harm your laptop components if you keep the fan speed for too long, so you must be fully aware about the risk of doing .
If you run your cooling fans at too high speed for prolonged periods of time, parts like bearing or fan blades within its assembly could wear out quickly, and the component might die all together. Or if you run them at too slow, you could put your laptop at risk, overheat could damage your laptop. So be sure to not go to either extreme when altering your fan speed.
Some laptop manufacturers like Dell don't allow you to change your laptop fan speed. So this guide might not work for you. Be sure to do a Google search about your laptop make and model before proceeding to this. This will make sure that whether you are able to tweak your laptop fan speed or not.
How To Increase Laptop Fan Speed
1. Speed Fan - Windows
Installing fan control software is by far the easiest method to change your laptop fan speed. It also allows you to setup custom fan speed, as well as define temperature target points where the fans either speed up or slow down.
There are plenty of software available on the internet, and the software I'm talking about is one of them. "Speed Fan" is one of the most popular software available for controlling your laptop fan speed. You can either speed up or slow down your laptop or desktop fan speed using this software at your ease.
The configurability with "Speed Fan" Software is endless. Once you have installed on your laptop or desktop, you get a new icon of "Fan Speed" Software in System Tray at the bottom corner of your screen.
To Download "Speed Fan" Click Here !
To Change the Setting of Software please follow steps mentioned below :
1. Double click the Software Icon that is located in Desktop window or in System Tray to open.
2. You will be greeted by the following window layout.
3. In software you will see a section marked with " Automatic Fan Speed" click if you want Speed Fan to automatically handle all fan controls for your laptop or desktop.
4. If you notice you can see all your system fans in this section.
5. You can also monitor the temperature of critical components in your laptop and desktop here.
6. Near the lower section of the window you can see a section with fan speed percentage.
7. Now using this you can increase or decrease the fan speed percentage here of each fan in your system.
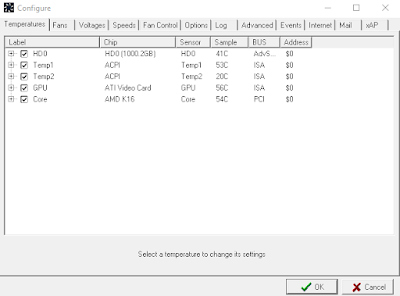
8. To alter the way the fan speed react to temperature changes , click on "Configure".
9. Over here you can see a list of all components Smart Fan can monitor.
10. Click on a specific Components, for example : Core 0 of your CPU.
11. Near the bottom of the window, you will see a section marked “Desired”. If you set it to 40C for example, Speed Fan will automatically alter the fan speed to keep this component at this desired temperature.
12. Click on the + symbol near the component you choose to expand it.
13. This will bring up your laptops cooling fans in the drop down, you can select which fans you want to have their speed increase/decrease when Core 0 goes above or below the “Desired” temperature.
For Latest Update Follow us on our Official Facebook Page: Techknowledgg FB Page


0 Comments